Friday, November 27, 2009

अपने कंप्युटर को सर्वर मे बदलें(पार्ट 2) - mysql - php कैसे चलाएं?

मैने पिछले पोस्ट मे बताया था की कैसे XAMPP ईंस्टाल करते हैं और अब MySQL, डाटाबेस बनाना और उसका प्रयोग कैसे करना है वो बताने जा रहा हूं।

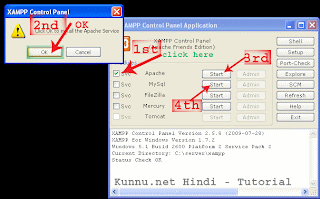
पहले "XAMPP Control Panel" को ओपन करें और Apache के साईड मे Modules लिखा होगा उसके निचे Svc लिखा होगा उसपर क्लिक कर के ओके करना है।  फिर अपाची को स्टार्ट करना है और MySQL को भी।

स्क्रिन साट:

अब अपना ब्राउजर खोलीये और उसमे localhost टाईप कर के एन्टर दबा दें।

अगर आपको xampp का पेज दिखता है तो ठिक है फिर आप

ये लिंक अपने ब्राउजर मे खोलीये

http://localhost/security/xamppsecurity.php

अब उसमे आपको MySQL SuperUser: का पास्वर्ड सेट करना है।

New password: root
Repeat the new password: root

Note:-  अगर आपको आपका पास्वर्ड सेट करना है। तो सेट कर सकते है


स्क्रिन साट:

अब अगर आप पास्वर्ड मे root डालते हैं तो आपका MySQL का यूजर नेम ये होगा Username: root
Password: root  अब आपको अपने Xampp डायरेक्ट्री को पास्वर्ड प्रोटेक्टेड बनाना है।

XAMPP DIRECTORY PROTECTION (.htaccess)

उसमे भी पास्वर्ड डाल दें।

अब आपका phpMyAdmin पास्वर्ड प्रोटेक्टेड हो गया है।

MySQL कैसे बनाएं?

यहां http://localhost/phpmyadmin/  पर जा कर अपना username और paasword डाल के लागईन कर लें।

username: root

और वही पास्वर्ड डालें जो आपने सेट किया था।

अब लागईन होने के बाद Create New Database मे कोई नाम डालीये जैसे मै jmdcomputer डाल रहा हूं।

और अब Create पर क्लिक कर दें।

स्क्रिन साट:

अब आपने MySQL का एकाऊंट भी बना लिया है और डाटाबेस भी। तो अब आप कोई भी स्क्रिप्ट ईन्स्टाल कर सकते हैं। आपका एकाऊंट एसा होगा।

host: localhost

user: root

pass: root

database: jmdcomputer

अब आप स्क्रिप्ट कहां डाल सकते हैं, फाईल कहां डालेंगे?

अपने कंप्युटर मे जहां पर भी आपने अपना xampp डाला होगा उसमे जाएं। जैसे मैने यहां डाला है C:\server मे और आपको जाना है htdocs फ़ोल्डर मे। जैसे मै यहां जाउंगा। C:\server\xampp\htdocs और ईस फोल्डर मे जो भी हो उसे डिलीट कर दें और उसमे आप अपना फाईल, स्क्रिप्ट डाल कर चलाईये।

index.php या index.html डालेंगे तो ब्राउजर मे http://localhost  खोलने पर सिधे आपका index पेज दिखेगा।

पार्ट 1 पोस्ट यहां है

- JMD Computer                                                       Give Comment

source:- http://kunnu.net

Thursday, November 26, 2009

अपने कंप्युटर को सर्वर मे कैसे बदलें? - PHP,MySQL सभी कूछ चलेगा।

क्या आप कोई स्क्रिप्ट या साईट अपने कंप्युटर मे ही चलाना चाहते हैं? या कोई साईट बना रहे हैं और उसमे आपको बार बार वो साईट खोल कर देखना पड रहा है की पेज मे क्या बदला है?  अगर हां तो अब टाईम बर्बाद करना बंद करें।

ये सिर्फ पेज बनाने, स्क्रिप्ट चलाने के ही काम नही आता आप ईसमे FTP,PHP,MySQL,Apache आदी सभी सिख सकते हैं वो भी अपने कंप्युटर  मे।

Direct Tutorial

पहले आपको XAMPP यहां क्लिक कर के डाउन्लोड करना होगा।

  • 32Bit के विन्डोज एक्स-पी प्रयोगकर्ता यहां क्लिक कर के XAMPP डाउन्लोड कर सकते है।

Download Link

http://nchc.dl.sourceforge.net/project/xampp/XAMPP%20Windows/1.7.2/xampp-win32-1.7.2.exe


डाउन्लोड होने के बाद आप ईस साफ्टवेयर को जहां भी डालना चाहते हैं वहां एक फोल्डर बना लें जैसे मै ईसे यहां  डालने जा रहा हूं

C:\server

अब XAMPP को रन करें और ईन्स्टालेसन डायरेक्ट्री डालें और ईन्सटाल पर क्लिक कर दें।

स्क्रिन साट:


अब ईंतजार करें ईस्टालेसन पूरा होने का।

DOS खूलेगा और अब आपको प्रशन के जवाब देने हैं। बस आपको मै जसे बता रहा हूं वैसे ही कर दें।


अबर आपके कंप्युटर मे पहले से ही y लिखे आ रहा है तो आपको y दबाने कि जरूरत नही है बस सिधे एन्टर दबा दें।

1.   अगर y पहले से ही लिखा है तो एन्टर दबा दें

2.   फिर एन्टर दबा दें

3.   फिर एन्टर दबाएं और फिर पूछेगा की Press (Return) to continue - एन्टर दबा दें। और एक बार फिर यही कहेगा की Press (Return) to continue - एन्टर दबा दें। अब आपको "1"  दबा कर एन्टर दबाना है।


ईन्सटालेशन पूरा हो गया पर अब आपको ईसको चलाना बता दूं ताकी आप ईसमे MySQL आदी सभी आसानी से बना सकें और उसका पूरी तरह से प्रयोग कर सकें।

आपको एक कंट्रोल पैनल दिख रहा होगा - अगर नही खूला है तो डेस्कटाप पर एक्जेम्प का सार्टकट आईकन होगा उसपर क्लिक कर के एक्जेम्प को खोलें।

अब सबसे पहले आपको Apache के Modules के निचे Svc पर क्लिक कर  के फिर  उसके साईड मे "Start" पर भी क्लिक करना है और हां ईनपर क्लिक करने के बाद आपको कूछ देर तक ईंतजार करना पड सकता है।

अब MySQL के सामने Start पर क्लिक कर दें। जब दोनो Apache और MySQL पर "Running" लिखा होगा तो समझीये सब ठिक है।

Screenshot:

अब आपके कंप्युटर के सर्वर का दो एड्रेस है। आप ईसे अपने कंप्युटर पर खोल सकते हैं।

http://127.0.0.1

http://localhost

या SSL वाला एड्रेस(अगर SSL प्रयोग करना हो तब)

https://127.0.0.1

https://localhost

अगले पोस्ट मे बताऊंगा की कैसे MySQL, PHP, phpMyAdmin का प्रयोग करना है। अगला पोस्ट कुछ ही दिनो मे लिखने वाला हूं....

- JMD Computer                                                       Give Comment

source:- http://kunnu.net

पार्ट 2 पोस्ट यहां है

Wednesday, November 25, 2009

આ જુઓ એક એન્જીનિયર જઇ રહીયો છે…

જીંદગીથી હરેલો છે, પણ ‘બગ’થી હાર નથી માનતો,
પોતાના ‘પ્રોજેક્ટ’ના બોજ હેઠળ દબાઇ જઇ રહીયો છે,

પોતાની ‘એપ્લીકેશન’ની એક એક લીટી યાદ છે,
પણ આજે પગમાં ક્યા રંગના મોજા છે તે યાદ નથી,

દસ હજાર લીટીનાં ‘કોડ’માં ‘એરર’ શોધી લે છે,
પણ મજબૂર મીત્રોની આંખમાં આંસુ દેખાતા નથી,

‘કોમ્પ્યુટર’માં હજારો ‘વિન્ડો’ છે,
પણ દિલની બારી પર કોઇ દસ્તક સંભળાતી નથી,

‘કૉડીંગ’ કરતા કરતા ખબર જ ના રહી,
‘બગ’ની ‘પ્રાયોરીટી’ ક્યારે માતા-પિતા કરતા વધી ગઇ,

પુસ્તકોમાં ગુલાબ રાખવાવાળો ‘સિગારેટ’ના ધુમાડામાં ખોવાઇ ગયો,
દિલની જમીન પરથી ઇછ્છાઓની વિદાઇ થઇ ગઇ, શનિ-રવિ પર દારુ પીને મજા કરી રહીયો છે,

ખર્ચા વધી રહ્યા છે, વાળ ઓછા થઇ રહીયા છે,
આ જુઓ પાછી ‘બસ’ છૂટી ગઇ ને ‘રિક્શા’થી આવી રહીયો છે,

‘પીત્ઝા’ ગળે નથી ઉતરતા તો સાથે ‘કોક’ના ઘૂંટડા લઇ રહીયો છે,
સરસ ભેળ મળે છે છતાં મફતનો નાસ્તો ખાઇ રહીયો છે,

‘ઓફિસ’ની થાળી જોઇ મોઢુ બગાડે છે,
માઁના હાથનું જમવાનું યાદ આવી રહીયુ છે,

હજારોના પગારવાળો ‘કંપની’ના ખિસ્સામાં કરોડો ભરી રહિયો છે,
આ જુઓ એક એન્જીનિયર જઇ રહીયો છે…

- JMD Computer                                          Give Comment

PC TIPS (WIN XP)

~~~*Automated Installation for XP*~~~
Automate The Installation Of Windows XP

You can create a CD that can install Windows XP automatically, putting in all the details and answering all the dialog boxes.

The secret behind this is the answer file, which tells Windows what to do while it's installing. The answer file can be created using Windows setup manager.

Using this tool, you can make the answer file so powerful that you can even tell Windows to include or exclude individual components, set the display resolution, and more.

Here's the Steps involved in creating XP Automated Installation Disc:

Step 1: To begin with, insert your Windows XP installation CD into the drive and copy the entire contents of the CD to a new folder on your hard disk.

Step 2: Navigate to the Support > Tools folder on the CD and double-click the Deploy.cab file. Copy all the files to a new folder on your hard disk.

Step 3: The crucial part begins now, creating the answer file. To execute the windows setup manager, double click the Setupmgr.exe file from the contents of the Deploy.cab, which you just copied onto the hard drive.

Step 4: The first few steps of the wizard are self explanatory. Select the following options from the successive dialog boxes. Create a new answer file; Windows unattended installation (Select the appropriate Windows version); "Fully automated"; "No this answer file will be used to install from CD"; and finally, accept the license agreement.

Step 5: Under the General Settings, you can customize the installation of Windows by providing the default name and organization, display settings, time zone and the product key. Fill in the fields using the drop-down list or by keying in the details. If you don't select an option from the drop-down list, the default values will be used.

Step 6: After you are done click Finish and save the answer file as "winnt.sif" when you are prompted. Advanced users can further tweak the answer file by referring to the Help file called Ref.chm in the same folder.

Step 7: Finally copy the answer file to i386 folder in the Windows XP installation folder you created in the beginning.

Step 8: To burn a bootable installation disc, you need the boot sector of the Windows XP CD. Download it from here bootfiles.zip

Step 9: Launch Nero and select CD-ROM (Boot) from the New Compilation dialog box. Under the Boot tab, specify the boot sector file you downloaded and extracted. Set the emulation as "No emulation", and keep the boot message blank. Most importantly, remember to set the "Number of loaded sectors" as 4.

Step 10: Under the Burn tab, set the write method to disc at-once. Click the New button to to begin adding files and folders to the compilation. Drag all the contents of the Windows XP installation disc that you copied to your hard drive (with the answer file in the i386 folder) into the left pane.

Insert a blank CD into the optical drive and hit burn button.

Your windows automated installation Disc is ready!

- JMD Computer                                                                  Give Comment

Friday, November 20, 2009

Update your Windows XP drivers

Fast, quick and easy, DriverScanner boosts computer performance by scanning for, downloading and then installing updates for all your device drivers including:
  • Monitor, mouse, keyboard, CD/DVD
  • Sound & graphics cards
  • Motherboard & BIOS, USB, Modem & network adapters
  • Camera, printer, scanner & other plug and play devices

    What are drivers?

    Drivers are snippets of software that are needed for your Windows operating system to communicate with each of the hardware devices that are connected to your computer.

    Why should I update my drivers?

    Like any software, drivers are upgraded and updated by the manufacturers, to remove bugs, add extra functionality to the hardware or to improve the performance of the device. Unless you update your drivers regularly you may face problems ranging from the relatively minor, such as having hardware that seems buggy and poorly performing, to the more major such as hardware failures, conflicts and complete system crashes.

    What does Driver Scanner do?

    With so many drivers on your PC you can´t check them all yourself, which is why DriverScanner, the innovative new product from Uniblue, is the perfect solution to your driver update problems. This useful application will search your PC for all installed drivers and then cross reference these against Uniblue´s authoritative library of drivers. Where DriverScanner identifies outdated drivers it will then give you the tools to update your PC with the latest versions, so improving the performance and stability of your computer and its peripherals.
    Release the full functionality of your PC now with Driver Scanner.


    - JMD Computer                                                         Keep Comment


    * if Link is Broken, fill free form click here with Link Details.

Saturday, November 7, 2009

Update Checker

What is it?

The Update Checker will scan your computer for installed software, check the versions and then send this information to Site to see if there are any newer releases. These are then neatly displayed in your browser for you to download. Please note that not all programs are supported.

But it gets better...

The client is FREE, just over 100kb to download and only takes seconds to run! In fact on our test machines the process is complete in under 2 seconds!

What are the requirements?

The Update Checker works on any Windows PC running Vista, XP, 2003, 2000, ME or 98. It requires that the Microsoft .NET Framework 2.0 is installed, which you may download directly from here, or the installer will prompt and download it automatically.

download button - JMD Computer                                                                        Keep Comment

* if Link is Broken, fill free form click here with Link Details.

रजिस्ट्री एडिटर, क्लीनर, टास्क मेनेजर, सिस्टम स्पीडर टूल

Windows Doctor is a top professional program on the security protection and system optimization of the Windows operating system.

image

It thoroughly scans patch vulnerabilities, Startup items, plug-ins, services and processes, etc., in the system with its rapid and stable search engine to diagnose possible security threats and protect your system from the threats of spyware, adware, Trojans and viruses.

image

Windows Doctor also provides functions such as Registry Cleanup, Privacy Cleanup, System Speed-Up and Advanced Tools. They help you clean up garbage information in the registry, protect your privacy, make your computer run more stable and with better performance.

image

Main Features:

Windows Security Analysis:

Windows Doctor can fix security vulnerabilities in the Windows operating system, clean Startup items, BHOs, services and processes that threat system security to provide you with a safer system.

Registry Cleanup:

The program rapidly and thoroughly search and clean useless and invalid information in the registry, so your system can run faster and more stable.

Privacy Cleanup:

It thoroughly cleans the traces of your Internet access and software use in the system to protect your privacy. The function supports many applications such as Internet Explorer, Mozilla Firefox, Opera, Yahoo Messenger, Adobe Photoshop, Adobe Acrobat Reader, WinZip, Windows Media Player, RealPlayer, etc.

System Optimization:

The function of System Speed-Up analyzes various information such as CPU, memory, services and drivers, and intelligently provides an optimized solution based on the current system configuration.

Utilities:

"Utilities" (Advanced Tools) includes System Information, Service Manager, Process Manager, BHO Manager and Startup Manager.

Update Wizard:

Update Wizard helps you make sure that you are using the latest version of Windows Doctor, in turn, to protect your system more thoroughly.

Restore:

Windows Doctor supports full restoration which can help you restore any modifications you made on the system.

एक ऐसा सॉफ्टवेर जो आपके स्टार्ट प्रोग्राम को मानगे करे टास्क मेनेजर की तरह भी काम करे , अस्थायी फाइल डिलीट करे अपडेट डाउनलोड करे सिस्टम की स्पीड बढाये सब कुछ १ ही सॉफ्टवेर में तो देर मत करिए आजमा के देखिये

डाउनलोड / Download


Serial Number / सीरियल - 6038 1692 0574 2545 8671

download button

- JMD Computer                                                             Keep Comment

* if Link is Broken, fill free form click here with Link Details.

नया Opera 10.10 Beta 1 (Build 1833)

image

ऑपेरा अब अपने दसवें रूप से भी आगे बढ़ गया है । नया वर्जन अब आपके लिए मुफ्त में उपलब्ध है शायद ये सबसे अच्छा ब्राउजर ना हो पर इसमे चित्र वाले वेबसाइट बहुत तेजी से खुलते है अन्य ब्राउजर की तुलना में ये मेरी राय है आजमाइए और अपनी राय बनाइये ।


यहाँ क्लिक कर डाउनलोड करें

download button

- JMD Computer                                                                Keep Comment

* if Link is Broken, fill free form click here with Link Details.

नया Microsoft .NET Framework 4 Beta 2

माइक्रोसॉफ्ट के एक उपयोगी उत्पाद का नया वर्जन 38 एमबी आकार में ।

image
ये तकनीकी रूप में कहें तो कोड प्रोग्रामिंग मॉडल है जो .नेट में बनाये प्रोग्राम को support करता है आपके पास अगर कोई ऐसा प्रोग्राम है जो .नेट में बनाया गया है तो उसे चलाने का विन्डोज़ द्वारा दिया गया प्लेटफोर्म है । जैसे जावा प्लेटफोर्म उसमे बनाये सॉफ्टवेर को सपोर्ट करता है । (जैसा सतीश जी ने बताया )


ये vjRn विन्डोज़ एक्सपी 3 या उससे ऊपर के वर्जन के लिए है ।


यहाँ क्लिक कर डाउनलोड करें ।

startpageBottom_en


- JMD Computer                                                                Keep Comment

* if Link is Broken, fill free form click here with Link Details.

Thursday, November 5, 2009

कोई भी साईट आखिरी बार कब अपडेट हुई थी ,यह जानने का बहुत ही सरल तरीका

कोई भी वेबसाइट आखिरी बार कब अपडेट हुई है, यह पता करना कई मायनों मैं जरुरी हो जाता है ,मसलन उस पर मौजूद जानकारी, समाचार कितने पुराने है | ये जानने के लिए एक बहुत ही सरल तरीका है, वो मैं यहाँ बता रहा हूँ |

जिस साईट के बारे में आप जानना चाहता है, पहले उसे खोले ,उसके ब्राउजर के URL Box में ये

javascript:alert(document.lastModified)


java script लिखकर इंटर प्रेस करें, बस आपने सामने एक पॉप्स-अप मेसेज में सारी जानकारी मिल जायेगी |

- JMD Computer                                                    Keep Comment

Monday, November 2, 2009

How to Send Anonymous Emails

Most of us are very curious to know a method to send anonymous emails to our friends for fun. But the question is, is it possible to send anonymous emails in spite of the advanced spam filtering technology adopted by email service provides like Gmail, Yahoo etc? The answer is YES, it is still possible to bypass their spam filters and send anonymous emails to your friends. For example, you can send an email to your friend with the following sender details.

From: Bill Gates <billg@microsoft.com>

The art of sending this kind emails is known as Email Spoofing. today it has a very low success rate since Gmail and Yahoo(all major email service providers) blocks the emails that are sent directly from a PC. In this post I have come up with a new way to send anonymous emails (spoofed emails) that has 100% success rate. If you have to successfully send an anonymous email or spoofed email, you should send it using a relay server.

What is a Relay Server?

In simple words, a relay server is an SMTP Server that is trusted by Google or Yahoo as an authorised sender of the email. So, when you send an email using a relay server, the email service providers like Yahoo and Gmail blindly accept the emails and deliver it to the inbox of the recipient. If the SMTP server is not authorised, Google and Yahoo will reject all the emails sent from this SMTP server. This is the reason for which using our own SMTP server to send emails fail.

So What’s Next?

Now all we have to do is, find a trusted SMTP server to Send Spoofed Emails. Usually all the emails that are sent from web hosting providers are trusted and authorised. So, you have to find a free web hosting provider that allows you to send emails. But, most of the free Web Hosts disable the Mail feature and do not allow the users to send emails. This is done just to avoid spamming. However all the paid hosting plans allow you to send any number of emails. Once you find a hosting service that allows to send emails from their servers, it’s just a cakewalk to send anonymous emails. All we have to do is just modify the email headers to insert the spoofed From address field into it.

I have created a PHP script that allows you to send emails from any name and email address of your choice. The script can be found here.

Anonymous Email Sender Script

Here is a step-by-step procedure to setup your own Anonymous Email Sender Script

1. Goto X10 Hosting and register a new account.

2. Download my Anonymous Email Sender Script (sendmail.rar).

3. Login to your FreeWebHostingArea Account and click on File Manager.

4. Upload the sendmail.php, pngimg.php and bg1.PNG files to the server.

5. Set permissions for sendmail.php, pngimg.php and bg1.PNG to 777.

6. Now type the following URL

http://yoursite.x10hosting.com/sendmail.php

NOTE: yoursite must be substituted by the name of the subdomain that you have chosen during the registration process.

7. Use the script to send Anonymous Emails. Enjoy!!!

Tell me whether it worked or not. Please pass your comments…

WARNING: ALL THE INFORMATION PROVIDED IN THIS POST ARE FOR EDUCATIONAL PURPOSE ONLY. I AM NOT RESPONSIBLE FOR ANY MISUSE.

- JMD Computer                                                                Keep Comment

* if Link is Broken, fill free form click here with Link Details.

Restore and Speed up your PC performance

Why Use Registry Easy

Registry Easy™ uses a high-performance detection algorithm that will quickly identify missing and invalid references in your Windows registry. With a few easy steps Registry Easy™ will scan your entire Windows registry for any invalid or obsolete entries and provide a list of the registry errors found. After that you can choose to clean list items with selection or automatically repair them all.

For your convenience and protection, Registry Easy also provides a backup mechanism for any repaired files so that you can easily recover any changes if required.

Cutting-Edge Diagnostics and Repair Solutions Registry Easy is the safest, most robust and trusty solution to thoroughly clean and optimize your system, free it from registry errors and fragmented entries cause system slowdown, freezing and crashing. Registry Easy is designed to provide complete care for your PC. It includes a quick error scan, privacy cleanup and entire system scans that can find and fix invalid & missing registry entries and clean up temporary files.


startpageBottom_en

- JMD Computer                                                                  Keep Comment

* if Link is Broken, fill free form click here with Link Details.

Source:- http://www.gohacking.com/recommends/regeasy.html

Error Reporting in XP

image

If error reporting in XP is bugging you then turn it off.

When a system error occurs in XP, a little dialog box appears asking if you want to report the error to Microsoft. Click the message box to make it disappear. You don't have to report the error if you don't want to and on today's "Call for Help" Leo shows you how to turn off the feature if you find it distracting.

To disable error reporting, follow these directions:

1. Right-click My Computer and choose Properties.

2. Click the Advanced tab on your System Properties dialog box.

3. Click the Error Reporting button on the Advanced tab.

4. Place a checkmark next to "Disable error reporting."

5. Leave the other radio button unchecked next to the text labeled, "But notify me when critical errors occur."

6. Click OK.

- JMD Computer                                                     Keep Comment

* if Link is Broken, fill free form click here with Link Details.

Remove Thumb.db File

Thumb.db is is a cache of the current picture in that directory.to remove it go for following

Step 1 > open "WINDOWS EXPLORER".

Step 2> go to "TOOLS".

Step 3> open "FOLDER OPTIONS".

Step 4> go to "VIEW".

Step 5> see 1st section "FILES & FOLDERS".

Step 6> click on the "DO NOT CACHE THUMBNAILS".

now the thumbnail file will be removed from your computer once you do this the file will be never created.

- JMD Computer                                                  Keep Comment

* if Link is Broken, fill free form click here with Link Details.

Convert PowerPoint to Flash in One Click

Free PowerPoint to Flash converter creates web-friendly Flash movies from your PowerPoint content keeping its visual parameters and animation effects during conversion.

iSpring Free works within PowerPoint, transforming it into a fast and easy Flash authoring tool.

Just click Quick Publish and iSpring will generate a Flash movie from your PowerPoint presentation in just a few seconds.

Special Features :


Easily distributable in Flash format which is used everywhere and is optimized for the web.

Highly compatible regardless of viewers' platforms and browsers.

Accessible to the worldwide audience on the free Slide Boom online portal.

Rapidly viewed as streaming Flash starts playback as soon as the first slide is loaded.
Secure as .swf files are not easily pirated, accessed or changed.

Link is here: http://www.ispringsolutions.com/products/ispring_free.html

- JMD Computer                                              Keep Comment

* if Link is Broken, fill free form click here with Link Details.

 
Design and Bloggerized by JMD Computer